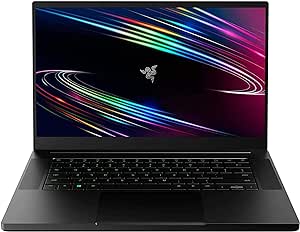
How To Take Screenshots On The Razer Blade 15 Laptop?
In the fast-paced digital landscape, seizing the perfect screen moment is vital. If you are a Razer Blade 15 laptop user, then knowing How to take screenshots on the Razer Blade 15 laptop is a must. whether you are a gamer celebrating triumphs or a user documenting crucial information. The Razer Blade 15 laptop, known for its powerful performance, provides several straightforward methods for capturing screenshots. Imagine effortlessly freezing your gaming victories, preserving important data, or sharing a snippet of your screen with friends. This guide unveils various techniques, from the classic keyboard shortcuts, such as the Print Screen key, to the advanced features like the gaming mode screenshot.
Furthermore, whether you are a tech novice or a seasoned user, this article will walk you through the diverse ways you can capture and share your screen moments on the Razer Blade 15, ensuring you never miss a noteworthy screenshot again. Let’s embark on a journey to unlock the full potential of your laptop’s screenshot capabilities.
Taking Screenshots On The Razer Blade 15 Laptop By Using Keyboard Shortcuts Method:
Taking screenshots on your Razer Blade 15 laptop using keyboard shortcuts is a straightforward process. Here’s a step-by-step guide:
Capture Entire Screen:
Locate the Print Screen (PrtScn) key on your keyboard and click on it to capture the screen.
Capture Active Window:
Open the window you want to capture. Press Alt + PrtScn simultaneously. This captures only the active window and copies the screenshot to the clipboard.
Paste and Save:
Open a graphics editing software or a document where you want to use or save the screenshot. Press Ctrl + V to paste the screenshot from the clipboard.
These simple steps allow you to efficiently use keyboard shortcuts to capture and save screenshots on your Razer Blade 15 laptop.
By Using the Snipping Tool Method To Take Screenshots On The Razer Blade 15 Laptop:
Snipping Tool is a user-friendly process for capturing screenshots on your Razer Blade 15 laptop. The below steps will take you to do the process:
Open the Snipping Tool:
Click on the Start menu and search for Snipping Tool. Open the Snipping Tool application from the search results.
Choose Snip Type:
Once the Snipping Tool is open, click on ‘New’ to start a new snip and select the type of snip that you wish to capture.
Capture the Screenshot:
For a Free-form or Rectangular snip, click and drag the cursor to select the area you want to capture. For a Window snip, click on the window you want to capture. Moreover, for a Full-screen snip, capture the entire screen.
Annotate:
The Snipping Tool allows you to annotate the screenshot. Click on the ‘Pen or Highlighter’ tools to add notes or emphasis.
Save the Screenshot:
After capturing the screenshot, click on File and then Save As to save the image.
By following these steps, you can easily use the Snipping Tool on your Razer Blade 15 laptop to capture and save screenshots with precision and customization.
Utilizing Gaming Mode Method For Capturing Screenshots On The Razer Blade 15 Laptop:
Capturing screenshots using the Gaming Mode Screenshot feature on your Razer Blade 15 laptop is designed for quick and seamless in-game captures. As mentioned below are the simple steps:
Activate Gaming Mode:
Ensure your Razer Blade 15 is in Gaming Mode. This mode enhances performance and activates specific gaming features.
Access the Gaming Mode Screenshot Function:
While in Gaming Mode, locate the Fn (Function) key on your keyboard. Simultaneously press the Fn + PrtScn (Print Screen) keys.
Confirm the Screenshot:
Look for visual or audible cues that indicate the screenshot has been taken.
Locate the Screenshot:
The Gaming Mode screenshots are typically saved in a dedicated folder or library for game captures. Check your system’s default location for game screenshots.
Access the Screenshots:
Open the folder where the screenshots are saved, and you should find the captured images.
By utilizing these steps, you can efficiently utilize the Gaming Mode Screenshot feature on your Razer Blade 15 laptop to capture and preserve exciting moments during your gaming sessions.
Taking Screenshots On The Razer Blade 15 Laptop By Utilizing Third-Party Software:
The third-party software provides additional features and flexibility for capturing moments on your system. Here’s a general guide:
Download and Install Third-Party Software:
Choose a third-party screenshot tool like Snagit, Greenshot, or Lightshot. Visit the official website of the selected software, download, and follow the on-screen instructions.
Launch the Software:
Once installed, open the third-party software. It may create a shortcut on your desktop or be accessible from the Start menu.
Configure Settings:
Explore the settings within the software to customize capture options, output formats, and other preferences according to your needs.
Capture the Screenshot:
Use the designated hotkey or menu option within the third-party software to initiate a screenshot.
Edit and Annotate:
Most third-party tools come with built-in editing features. After capturing the screenshot, you can edit, annotate, or add effects as desired.
Save or Share:
Save the edited screenshot to your preferred location on your Razer Blade 15. Some tools also offer direct sharing options to social media or cloud storage.
Remember, the specific steps may vary slightly depending on the third-party software you choose. So, be sure to read the on-screen instructions of the tool.
Utilizing The Xbox Game Bar Method For Taking Screenshots On The Razer Blade 15 Laptop:
Utilizing the Xbox Game Bar for taking screenshots on your laptop is a straightforward process. Read the step-by-step guide:
Open the Xbox Game Bar:
Press the Windows key + G on your keyboard. This will open the Xbox Game Bar.
Access the Screenshot Tool:
In the Xbox Game Bar overlay, you will see various options. Look for the camera icon, which represents the screenshot tool.
Capture the Screenshot:
Click on the camera icon or press the PrtScn (Print Screen) key on your keyboard to capture the screenshot.
Check Notification or Save Location:
After taking the screenshot, the Xbox Game Bar may display a notification confirming the capture. Alternatively, the screenshots are often saved in a designated folder.
Access the Screenshots:
Open the folder where the Xbox Game Bar saves your screenshots to view and manage the captured images.
Edit or Share:
Depending on your preferences, you can use built-in tools or external applications to edit the screenshots before sharing or saving them.
By following these steps, you can efficiently use the Xbox Game Bar on your laptop to capture and manage screenshots.
Conclusion:
In conclusion, capturing screenshots on your Razer Blade 15 laptop is a breeze with various methods at your fingertips. Whether you choose the simplicity of keyboard shortcuts, the precision of the Snipping Tool, the versatility of third-party software, the gaming-focused options, or the accessibility of the Xbox Game Bar, you have an array of tools to suit your needs. Mastering these techniques empowers you to effortlessly freeze moments, share victories, and document important information with ease. Now, armed with these methods, go ahead and capture the screen moments that matter most to you on your Razer Blade 15.


