How To Take A Screenshot With The Apple iPhone 14?
The process of taking a screenshot on an iPhone had remained constant over the years until the release of the iPhone X in 2017. A screenshot was instantly taken and saved in your gallery when you quickly pressed the power and home buttons together. For iPhones with the Touch ID home button, this is still the case. However, it differs slightly for iPhones without a home button and Apple’s Face ID, such as the iPhone 11, iPhone 12, iPhone 13, and most recent iPhone 14 models. In the below paragraphs, I will share the methods to take screenshots. There I will fully describe how to take a screenshot with the Apple iPhone 14.
If you have recently upgraded your mobile device from a previous smartphone to the latest iteration of the iPhone 14 and are currently seeking guidance on how to capture a screenshot, you have arrived at the appropriate location. This article will provide you with a comprehensive tutorial on how to efficiently and effortlessly take screenshots. Here are some methods below. There I will fully describe how to take a screenshot with the Apple iPhone 14.
Take a Screenshot By Using the Side And Volume Buttons On Apple iPhone 14:
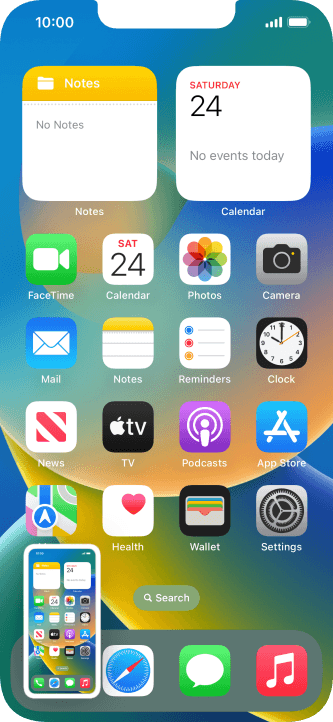
Capturing a screenshot of the latest iPhone models equipped with Face ID, namely the iPhone 14, iPhone 14 Plus, iPhone 14 Pro, and iPhone 14 Pro Max, is a straightforward process. One simply needs to simultaneously press the Side button and Volume Up button, and the screen will capture and display in a preview at the bottom left corner. It is advisable not to hold down the buttons for an extended period as it may activate the power function. If no editing or annotation is required, the screenshot can be easily swiped away or left as is. The image will be automatically saved in the screenshots category of the Photos app and the Library. The process is uncomplicated and effortless.
Editing The Screenshot:
However, if you’ve taken a screenshot but want to jazz it up a bit, just tap on the preview image at the bottom left of your screen. You’ll see a bunch of options pop up, including the markup icon at the top. This lets you scribble, adjust, and get creative with your screenshot using tools like pens, markers, pencils, rubbers, and even a lasso for cutting things out. Plus, there’s a whole color palette to choose from! And if that’s not enough, just hit the ‘+’ symbol to access even more tools like Text, Signature, a Magnifier, and cool shapes like circles and squares. You can also crop your screenshot to any shape you want, share it using the Share icon in the top right corner, or use the Live Text feature by tapping the icon in the bottom right corner.
Save The Screenshot:
At any given moment, it is possible to either retain or discard the screenshot by selecting the ‘Done’ option located at the top left corner of the screen. This action will present the user with the choice to either Save Photos or Delete Screenshots. If the user desires to share the screenshot with another individual or store it in Files, they may do so by selecting the Share icon and subsequently selecting the appropriate service. Upon completion of the aforementioned actions, the user may opt to click on ‘Done’ and eliminate the screenshot if it is no longer required.
Take A Screenshot By Using the Back Tap Of Your iPhone 14:
Did you know that with the new Back Tap feature in iOS 14 or later, you can do some pretty cool things with just a quick double or triple tap on the back of your iPhone? You can easily access the Control Center, take a screenshot, and even trigger accessibility-specific actions. How awesome is that? Give it a try and see how it can make your life easier!
Activate Back Tap with confidence by following these simple steps. Firstly, ensure that your iPhone has the latest version of iOS. Next, navigate to Settings > Accessibility > Touch, and confidently tap on Back Tap. Choose either Double Tap or Triple Tap and confidently select an action. Finally, confidently double or triple-tap on the back of your iPhone to trigger the action you have set. Take it a step further by confidently setting a double or triple tap to activate an Accessibility Shortcut, allowing you to access features such as Assistive Touch, Siri Shortcuts, Magnifier, Reachability, and Voice Over with ease.
Take Screenshots by Using Assistive Touch With iPhone 14:
You can take screenshots easily with a feature called Assistive Touch. You can find it in the Accessibility section of the Settings app. First, you need to turn on the feature. Then, you will see a white circle on your screen. You can customize the circle by selecting “Customize Top Level Menu” and choosing “Screenshot.” Now, you can take a screenshot by tapping on the white circle and selecting the option. The Assistive Touch menu can also help you with other things like locking your iPhone and opening the Control Center.
To customize your menu, tap “Customize Top Menu,” pick an option, choose “Screenshot” from the list, and tap “Done.” To take a screenshot, tap the white circle and select “Screenshot.” The Assistive Touch menu can also help you lock your iPhone, open the Control Center, and more. This is an easy way to take screenshots with the Apple iPhone 14.
Take Screenshots by Using Siri’s Voice In iPhone 14:
Taking a screenshot on your iPhone is a breeze! Simply press the Power button and the Volume button simultaneously, as mentioned above. But wait, it gets even better! Thanks to the iOS 15 software update and beyond, Apple has made sharing screenshots a cinch. With the help of Siri, you can effortlessly take a screenshot and share it with your contacts, all without lifting a finger. That’s right, it’s all done through voice commands. So go ahead, capture, and share your screen with confidence!
How To Take & Share iPhone Screenshots With Siri:
Ensure that your iPhone is operating on iOS 15 or a more recent version, as this feature is not accessible on previous versions.
Begin by confidently stating, “Hey Siri, take a screenshot.” In no time, Siri will have it done for you effortlessly. You need not worry about anything else. Moreover, you can even share the screenshot with ease by simply asking Siri.
It is a straightforward process. In the future, one may utilize Siri to take and share screenshots instead of manually pressing buttons.
One of the advantages of utilizing Siri to share screenshots is that the images are temporarily stored on the clipboard rather than being permanently saved on the iPhone. This eliminates the need to revisit the photo gallery and delete the screenshots at a later time. This feature is reminiscent of the traditional ‘Print Screen’ function found in the Windows operating system but adapted for use on the iPhone and iPad.
Take Screenshots By Using Apps like Picsew or Tailor On iPhone 14:
Last but not least, if you’re looking for a way to take scrolling screenshots of content inside third-party apps or want more control over your screenshots (like saving them as PNG), I’ve got some great news for you! You can use apps like Picsew or Tailor to do just that. And the best part? You can try them out for free before deciding to buy the full versions via in-app purchase. Give them a go and see how they work for you!
Conclusion:
The iPhone 14, being a highly sophisticated mobile device, provides a plethora of options for capturing screenshots, enabling users to capture moments according to their preferences. Whether one prefers the conventional hardware buttons, the touchless Palm Swipe Gesture, or voice commands through Siri, or Google Assistant. Or any of the other advanced methods, the device offers all of these features.
Concluding my article, I have endeavored to provide a comprehensive guide on capturing screenshots on iPhone 14 smartphones. Each method has been thoroughly discussed to impart a clear understanding to the readers. It is my sincere hope that those seeking guidance have found the information presented to be helpful. For further clarification or understanding on any topic, please feel free to visit my website at any time. We are always available to assist you. Thank you for reading our guide on taking screenshots on iPhone 14.


