
How To Take Screenshots and Screen Recordings On a Mac?
Hello, friends hope you all are doing well in your lives. Today I am here with an interesting topic. Which is how to take screenshots and screen recordings on a Mac. As we all know there are many methods of taking screenshots on a Mac. But I will tell you some easy and time-saving techniques using Screenshots and keyboard shortcuts. While taking a screenshot you are provided by a panel of tools. This will make it easier for you to take screenshots and screen recordings with different options to control what you actually want to capture. For example, you are given choices of whether you want to set a timer delay or include the pointer or clicks.
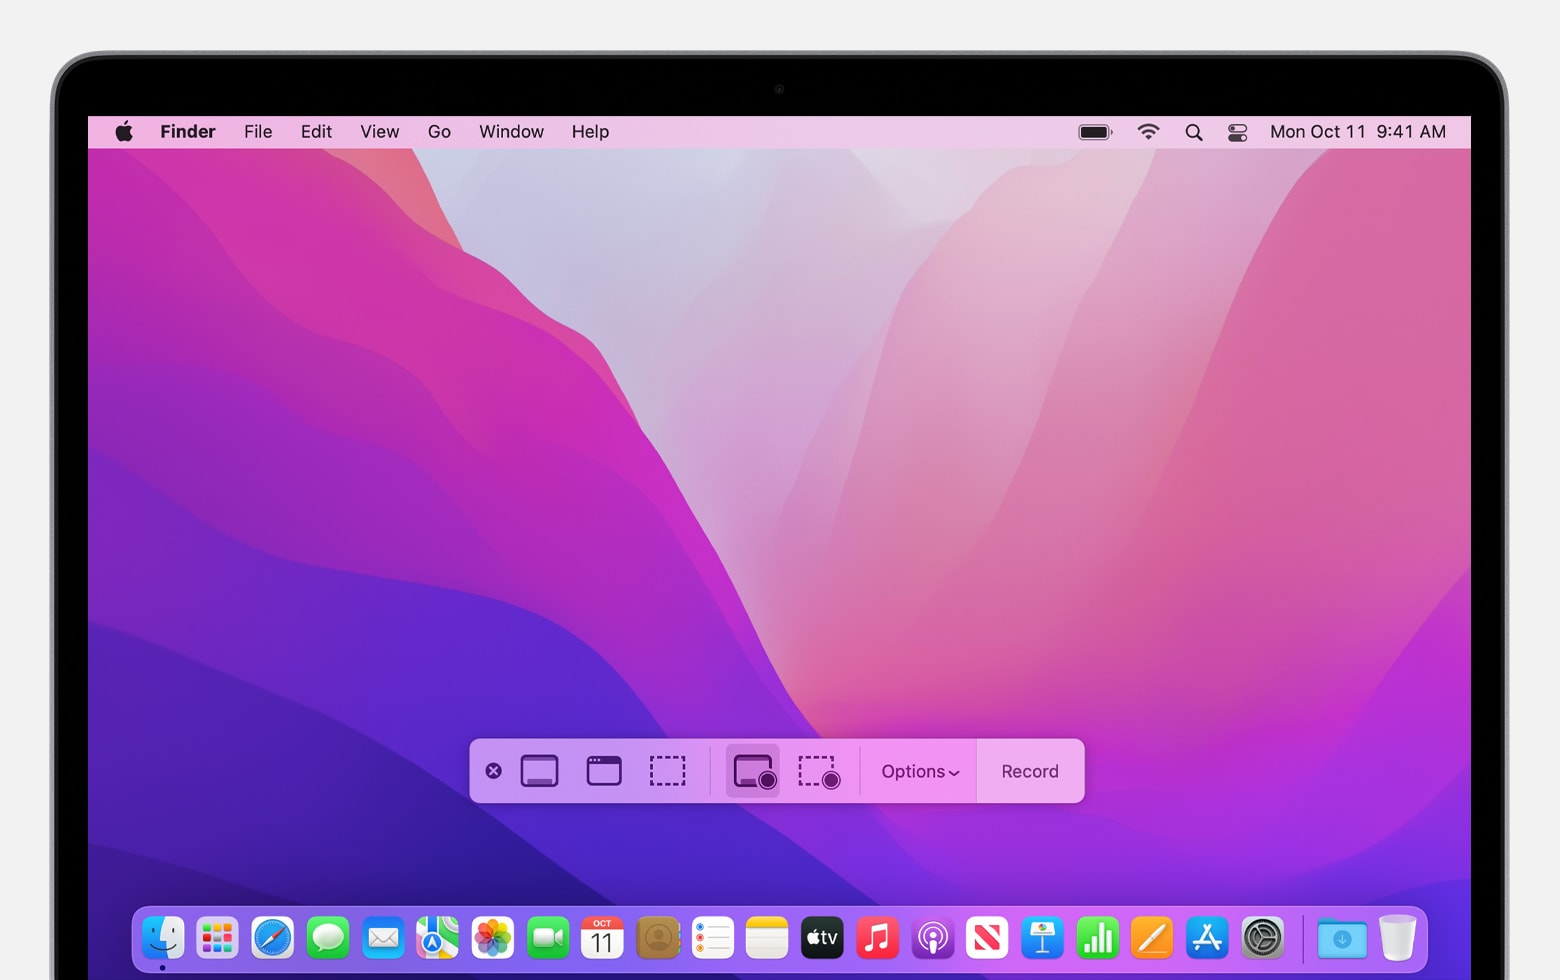
Take Pictures or Screen Recording Using Screenshots:
Here what you have to do is just press shift + command +5 on your Mac. This will open a screenshot and display the tools.
After this click on the tool to select what you actually want to capture. ( Here you can also use the touch bar to capture what you want). If you want to reposition your Mac screen just drag the frame and if you want to adjust the size of your Mac screen drag the screen from the edges.
Click Option If You Want:
As we know there are different options are there for everything based on what you actually want to take. For example, you are planning to take a screenshot or you are interested in recording your screen activities. There are options like setting a time delay or showing the mouse pointer or clicks and a specification for saving the file. ( This means that where actually do you want to save your files).
Here you can have another option. Which will help you to take complete shots or recordings more easily and fast. It is the floating thumbnail that flows at the bottom right corner of your screen. Here you will have a limited time to drag it from there to documents. Because it only lasts for a few seconds. So, be hurry or active on dragging it. Mark it up or share it before it’s saved to the file. Where you have specified it.
Start Taking Screenshots or Screen Recordings:
If you want to capture the entire screen or some portion of the screen. What you have to do is just click on the capture.
For a window, you have to move the pointer onto the window and click it.
if you want to record something. What you have to do is simply click on the record. If you want to stop the recording you are given a button in the menu bar named as stop recording button.
As I have discussed in the above paragraph about the show floating thumbnail. I think after reading the paragraph you have understood about the show floating thumbnail. It is clear that this is only set for a few seconds and after a few seconds it disappears from the screen. So while the thumbnail is set you can do some other activities and spend your time on useful activities. These activities are as follows.
Do you want to save your file immediately? If yes then swipe the screen to your right. After doing this it will automatically be saved and after that, it will disappear and you will get your save file there where you have selected the folder to save your file.
Do you want to save any picture or file in document form? If you are interested then simply drag it to the the documents.
By clicking the thumbnail you will open a window. Now you have options whether you want to make the screenshot trim the screen recording or you want to share it with your friends or family members.
How To Take Screenshots Using Keyboard Shortcuts?
As you all know everything has many methods and shortcuts. So, now I will discuss the second method of taking pictures. This method is easier simpler and time-saving than previous methods. Here simply you can use keyboard shortcuts to easily save screenshots onto the desktop.
Some keyboard Shortcuts Are:
1: If you have decided to capture a small portion of the screen. Firstly just press these buttons shift + command + 3. After doing this move the crosshair around the area where you want to take a picture of by pressing the mouse or trackpad button. At last release the button.
Capture The Entire Screen:
If you want to capture the entire screen. I will tell you a simple and easy keyboard shortcut. So, just press shift + command + 3. The entire screen will be captured and saved in a few seconds.
Open Screenshot:
If you are supposed to take an open screenshot just press these three keys shift + command +5. You will get whatever you want in a few seconds.
Capture The Touch Bar:
Are you thinking of capturing the touch bar? So, don’t worry I will tell easy and time-saving technique. So, the keyboard shortcut is to press these three keys shift + command + 6.
Capture a Window or Menu Bar:
If you want to capture a window or menu bar using this keyboard shortcut just press these three keys together shift + command + 4 after that press the space bar. After this move the camera pointer over the window or the menu bar to highlight it then click it.
Capture a Menu And Menu Items:
Are you having a problem while capturing a menu or menu items don’t worry. I will explain it to you. So, Read this carefully to get the best information. So, firstly press these keys together shift + command +4. After this, you have to take your pointer on the items you want to capture or record.
Customizing Keyboard Shortcuts:
So, finally, I will discuss the customization of keyboard shortcuts. For that firstly you have to open the keyboard settings on your Mac. After that open the Apple menu go to system settings then click the keyboard in the sidebar. Now click on keyboard shortcuts on the right then click screenshots. Now you can scroll down and you can customize your keyboard setting in a few minutes.
Conclusion:
So finally I am going to conclude my article. In this article, I have focused on a very interesting topic. Which is how to take screenshots and screen recordings on a Mac. I have explained every small thing in every detail and in simple words. If you want to benefit from this article read it up to the last paragraph you will get everything within a few minutes. I am very hopeful that this article will be helpful to everyone around the globe. At last, I would like to say thank you to those who have visited my site.


