
How To Take Screenshots on Laptops?
With the rise of technology, we have innovated technology to its best and have accomplished the unimaginable. We interact with various devices daily and entertain ourselves to the fullest. In terms of entertainment devices, nothing can make us enjoy more than devices with screens. We use screen devices like mobile phones, computers, televisions, laptops, etc. While we enjoy using these devices, sometimes we come across new information on these devices that we need to share with a friend or save for later use. Although it is very easy to capture a screen, i.e., taking screenshots on a phone with the procedure being pressing the volume down button and the power button at the same time or sliding three fingers from top to bottom of the screen, it can be more complicated on other devices such as laptops.
The reason for the unease in taking screenshots on laptops is due to various factors, including a variety of different operating systems, each with its different methods of capturing screenshots. For example, operating systems like MacOS by Apple, Linux OS, and Microsoft’s Windows OS have their specific keys and methods for capturing screenshots, which are described below in detail.
Taking Screenshots On A Windows Laptop:
Windows is one of the oldest and most popular operating systems for laptops and personal computers (PCs). It was developed by Microsoft, which is owned by our favorite billionaire, Mr. Bill Gates. It has been around since the development of the first computer and has assisted us since then. In different versions of Windows operating systems, there are various methods to take screenshots. Firstly, it was not possible to take a screenshot in older operating systems like Windows 97, 98, and 2000-2007. However, from Windows operating system version Windows Vista to Windows 7 and later, we got this amazing feature.
Method 1:
The first method of taking a screenshot is using an app called the Snipping Tool. It might not be available on Vista, but you can find it in Windows versions from Windows 7 and later by simply going into the Windows Start menu and searching for “Snipping Tool” and clicking the app with an icon of scissors on top of a circle. By opening the app, it dims the background and pops up a small window with options like “New,” “Save,” and “Settings.” Simply click “New,” and you will have a plus icon replacing the mouse cursor. Now, with a right-click and holding it, drag the cursor to the area you want to capture and release it at the point where you want to finish.
This will capture your selected area, and a new window will open with additional options to edit the captured screenshot. You can add text, and shapes, or use a pen to write or highlight a region if you want to. After that, save the file in JPEG or PNG format or in any format that pleases you. There you have it, the first method to save a screenshot in Windows 7 or later versions of Microsoft Windows.
A thing that should be addressed about the app is that with different versions of Windows, we might have a different style of the Snipping Tool, but the capturing method is the same as mentioned above. Other than that, it’s a completely free and official app of Microsoft, so it’s legal and safe to use, but make sure to be responsible while using it.
Method 2:
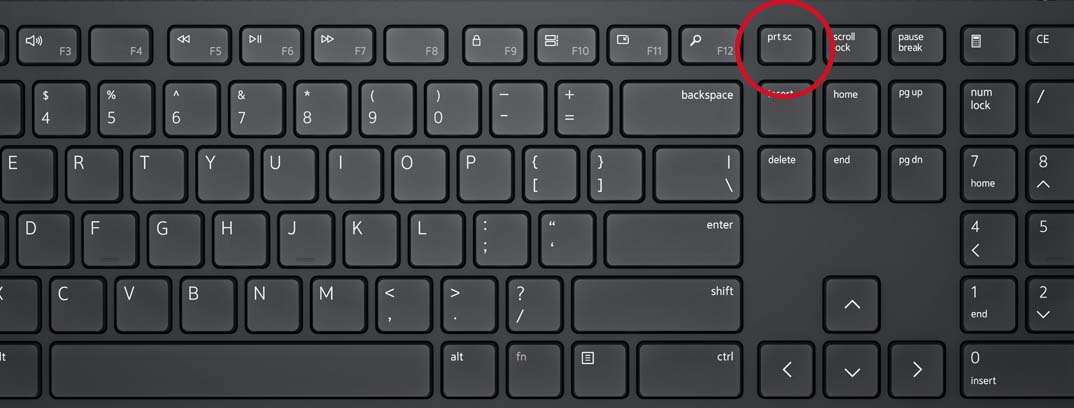
The second method to capture a screenshot on a Windows laptop is using a hotkey on the keyboard named the “Print Screen” key. If you press it, it captures everything displayed on the screen to your clipboard, then paste it into any paint app or photo editing app and save it in the format that pleases you.
Method 3:
The third method can only be used for Windows 10 or later. It’s a very easy and short method to capture a screenshot on laptops. By pressing “ALT + Print Screen,” you can directly capture a screenshot and save it to your camera roll. It is the most convenient method but is limited to the latest version of Windows that supports Microsoft’s active updates.
Taking Screenshots On MacBook:
MacBooks are laptops designed by Apple Inc. They are built by Apple, the same manufacturer of the infamous iPhone, which is one of the most expensive and high-performing mobile phones. Just like iPhones, they have their unique operating system that supports their ecosystem. This operating system is called macOS, and it is very unique, well-built, and optimized. It has its app store and operates unique apps. Taking a screenshot is also different on MacBooks, but it’s not as complicated as on Windows.
No matter what version of the operating system you are using, you can simply press “Command + Shift + 3” to take a screenshot of the whole screen. If you want to capture a specific area, just press “Command + Shift + 4” followed by space, and you can select and capture a specific area on the screen. Note that you have to press all these buttons simultaneously.
Taking Screenshots On Linux:
Unlike Windows OS and macOS, Linux is a relatively new and unpopular operating system among average laptop and PC users. But if you are using one and wondering how to capture a screenshot on a Linux device. The three methods are very easy to use.
The first one is to just press the “Print Screen” button on your keyboard. It will capture a snapshot of the full screen and save it to the picture directory directly. The second one is for capturing a specific window. Just press “Alt + Print Screen” simultaneously on your keyboard while keeping the window open. Thirdly, you can use tools like “Shutter” and “KSnapshot” which will also assist you in capturing screenshots on Linux devices.
Conclusion:
There you have it, all the methods for capturing screenshots on various types of laptops with a variety of operating systems. In this digitalizing world, screenshots are a very important part of our personal and professional lives. Although we can capture screenshots on phones easily by pressing the power button and volume down button. The methods mentioned above in the article are trusted and genuine methods to take screenshots on any laptop device.


