
How To Take Screenshots On Windows 10 And 11?
Hello, friends today I am here with an interesting topic that is related to Windows 10 and 11. The topic today I am going to discuss is how to take Screenshots on Windows 10 and 11. So, as we all know there are many methods of taking screenshots on Windows 10 and 11. Furthermore, if you want to capture the entire screen or only a small portion of the screen. We have got all the best ways below in the article. Moreover, let’s get started with some of the best and time-saving methods of taking screenshots on Windows 10 and 11.
Taking Screenshots Through The Print Screen Button:
The very first and easiest way to take a screenshot of your Windows 10 and 11 within a few seconds is by pressing the Prtscn(print screen) key on your keyboard. The print screen key is located in the upper right corner of the keyboard. Some of the keyboard models have different spelling of the key such as(print screen, prntscrn, prtsc, prtscr, prtScn). After doing this you will get a screenshot in a few seconds. Then the screenshot will be copied or you can save it to your screenshots folder. To save the file past the screenshot into any document like in the image editor or documents.
The Second Method To Take Screenshots is:
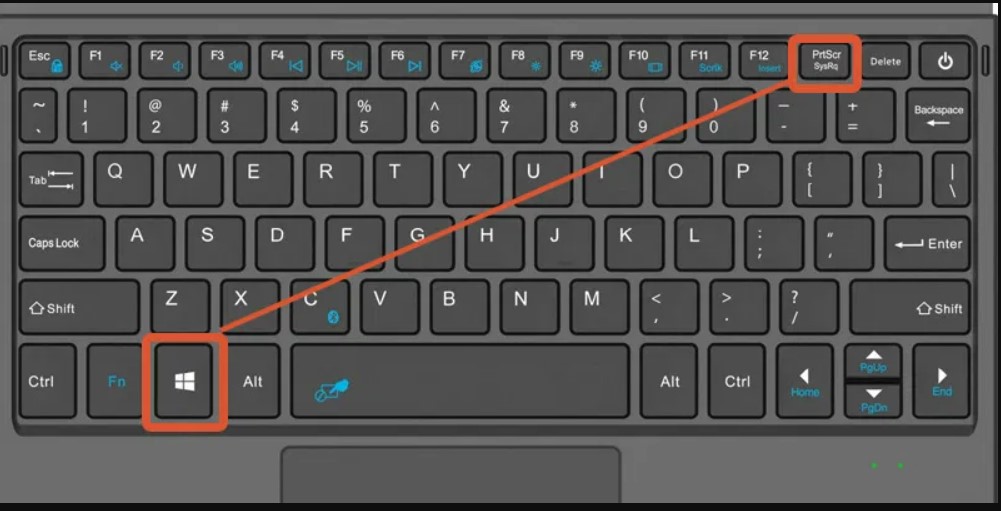
This method is also easy and time-saving. In addition, If you want to take screenshots through keyboard shortcuts in Windows 10 and 11. So, what you have to do is you just need to press these keys together Windows key + print screen. This method will automatically save the screenshot to the screenshot folder. While taking the screenshot your screen will dim for a second after a second the screenshot will be saved in the folder. After taking a screenshot you can easily share it with everyone.
Rapid Suggestion:
You can find the screenshots folder by opening File Explorer and clicking pictures in the left side panel( Navigation panel).
The Snip and Sketch Tool In Windows 10:
The Windows 10 and 11 snip and sketch tool is the best way to take screenshots. Because You can choose how you would like to take a screenshot. Moreover, There are four options through which you can take screenshots of your own choice. The four options are mentioned below:
Rectangular:
Make a rectangle of your own how much screen do you want to capture? You can fix the rectangle according to your needs.
Free form:
Here what you have to do is simply draw a free hand with your cursor. How much screen do you want to capture? This is also somehow the same as the above one.
Window:
Here you can choose a specific window to capture the screenshot.
Full Screen:
Here you can capture the entire screen. You can grab an image of the entire screen.
How To Access The Snip And Sketch Tool In Windows 10 And 11?
To access the snip and sketch tool use the keyboard shortcuts windows key + shift + s. Or you can do one more thing to access the tools simply type the snipping tool on your Windows search bar. While taking the screenshot your screen will go dim until you have not captured the screenshot and a mini menu will appear at the top of your screen giving you different options such as to take a rectangular, free form, windows, or full-screen capture. You can select one option among these options at one time You can not select two options at a time. You can use these four options separately. Once the screenshot has been captured.
It will be saved on your clipboard. In addition, a preview notification will emerge in the lower right corner of your screen. By selecting the preview notification you can run the Snip and Sketch app in this application you will have the option to save, share, or modify the screenshot of the drawing tool at your disposal.
Once you have taken a snip you have the option to edit it further by adding your searching. This can be done by choosing the pen or highlighter buttons. Which will enable you to write or draw directly on or around the captured image. If you find that you have made a mistake or want to make changes. You can use the eraser tool and remove the unwanted mistake. Simply select the eraser key. The keyboard shortcut for the eraser key is E. After pressing the eraser key you will be able to easily remove any lines or marks you have before adding. This feature gives you the ability to erase highlight and edit your snip easily without using any third-party app or website.
Taking Snip From Browser Window:
When you are taking a snip from within a browser window command to save it as an HTML file. You might have noticed that the consistent URL is shown below the snip. If you want to avoid the URL in this case. Here are some steps by which you can avoid the URL:
Firstly what you have to do is open the snipping tool and select the options button.
After pressing the options button you will open the snipping tool options box. Here deselect or discard the option which is labeled as ” Include URL below snips(HTML only)”.
After doing all the above processes confirm your changes by selecting the OK button.
By applying these steps you can easily avoid the URL from being included in your snips saved as HTML files. Preserve a cleaner performance of your captured content.
Conclusion:
In this article, I have focused on an interesting topic which is how to take screenshots on Windows 10 and 11. Here I have explained every single thing or concept in a very easy and better way. In addition, I just want to help those who are facing difficulty while taking screenshots on Windows 10 and 11. Here I have fully explained every step of taking screenshots on Windows 10 and 11. Hopefully, this will be easy to understand and helpful to everyone. Furthermore, I also have added apps through which you can easily take screenshots on Windows 10 and 11 and you can also edit the screenshots in a better way through these apps. At last, I would to say thank you to all. Who has visited my site and appreciated my work.


